
This is a complementary article for the talk “Svelte, Javascript, and the Web” given at the event ”Spring Meeting 2024 - Ho Chi Minh City”. The recorded video will be available soon on Svelte Vietnam’s Youtube channel.
Svelte is a framework for building user interfaces on the web. If you haven’t heard of Svelte or used it, I recommend you check out the famous talk ”Rethinking Reactivity” by Rich Harris, the author of Svelte. This video will give you an overview about Svelte and its fundamental difference compared to other frameworks.
In this post, I will provide two practical examples, through which we can somewhat see the differences in the API design of Svelte compared to other frameworks’. I have no intention of convincing you to abandon all the frameworks you are using and switch to Svelte, but I hope that, after reading this, you will agree that Svelte is a technology worth paying attention to.
Web is the Framework
Imagine you are a web developer who has never heard of any framework, and your task is: to capture click events outside an element:

This is quite a common feature. Remember the last time you encountered a dialog window or a modal, and clicking outside it would close the window? That is “clickoutside”. So, how would you implement this with vanilla Javascript? Here is one way:
export function clickoutside(node) {
  window.addEventLister('click', (event) => {
    if (!node.contains(event.target)) {
      node.dispatchEvent(new CustomEvent('clickoutside'));
    }
  });
}
Note that, we dispatch a CustomEvent named clickoutside when a click occurs outside the node element. CustomEvent is a standard web API, not specific to any framework. The example above allows us to reuse it with any HTML element:
<script type="module">
  import { clickoutside } from 'clickoutside.js';

  // reference tot he element
  const node = document.getElementById('my-element');

  // set up the clickoutside event
  clickoutside(node);

  // handle the clickoutside event
  node.addEventListner('clickoutside', () => { /* ... */ });
</script>

<div id="my-element">...</div>
Simple enough? Now how would you do it with your favorite framework? The following is a Svelte version of clickoutside:
<script>
  import { clickoutside } from 'clickoutside.js';

  const handleClickOutside = () => { /* ... */ };
</script>

<div
  id="my-element"
  use:clickoutside
  on:clickoutside={handleClickOutside}
>...</div>
Wait a second! What is clickoutside here? Well, it is exactly the same one as in the vanilla JS example above. Pay attention to the syntax use:clickoutside: our clickoutside function is used as a Svelte action. When using this syntax, Svelte will automatically pass the node parameter to the action, which is the HTML element the action is placed on. Finally, because node is set to emit the clickoutside event, we just need to attach the on:clickoutside event to the handleClickOutside handler.
Neat, huh?
Comparison to Vue and React
To see the difference, the following block lists actual implementations of clickoutside as written in Svelte from the library @svelte-put/clickoutside, React from the library usehooks-ts, and Vue from the library @vueuse.
// source code: https://github.com/vnphanquang/svelte-put/blob/9cedde8c33ecce7b1a4058425bf29b6f7a292b91/packages/clickoutside/src/clickoutside.js
export function clickoutside(node, param = { enabled: true }) {
	let { enabled, eventType, nodeForEvent, options, capture } = resolveConfig(param);

	/**
	 * @param {Event} event
	 */
	function handle(event) {
		if (!event.target) return;
		if (node && !node.contains(/** @type {Node} */ (event.target)) && !event.defaultPrevented) {
			node.dispatchEvent(new CustomEvent('clickoutside', { detail: event }));
		}
	}

	if (param.enabled !== false) {
		nodeForEvent.addEventListener(eventType, handle, options);
	}

	return {
		update(update) {
			nodeForEvent.removeEventListener(eventType, handle, capture);
			({ enabled, eventType, nodeForEvent, options, capture } = resolveConfig(update));
			if (enabled) nodeForEvent.addEventListener(eventType, handle, options);
		},
		destroy() {
			nodeForEvent.removeEventListener(eventType, handle, capture);
		},
	};
}

export function resolveConfig(param = {}) {
	return {
		enabled: param.enabled ?? true,
		nodeForEvent: param.limit?.parent ?? document,
		eventType: param.event ?? 'click',
		options: param.options,
		capture: typeof param.options === 'object' ? param.options?.capture : param.options,
	};
}// source code: https://github.com/juliencrn/usehooks-ts/blob/master/packages/usehooks-ts/src/useOnClickOutside/useOnClickOutside.ts
import type { RefObject } from 'react'
import { useEventListener } from '../useEventListener'
/** Supported event types. */
type EventType =
| 'mousedown'
| 'mouseup'
| 'touchstart'
| 'touchend'
| 'focusin'
| 'focusout'
export function useOnClickOutside<T extends HTMLElement = HTMLElement>(
ref: RefObject<T> | RefObject<T>[],
handler: (event: MouseEvent | TouchEvent | FocusEvent) => void,
eventType: EventType = 'mousedown',
eventListenerOptions: AddEventListenerOptions = {},
): void {
useEventListener(
eventType,
event => {
const target = event.target as Node
// Do nothing if the target is not connected element with document
if (!target || !target.isConnected) {
return
}
const isOutside = Array.isArray(ref)
? ref
.filter(r => Boolean(r.current))
.every(r => r.current && !r.current.contains(target))
: ref.current && !ref.current.contains(target)
if (isOutside) {
handler(event)
}
},
undefined,
eventListenerOptions,
)
}// source code: https://github.com/vueuse/vueuse/blob/1558cd2b5b019abc1feda6d702caa1053a182903/packages/core/onClickOutside/directive.ts
import { directiveHooks } from '@vueuse/shared'
import type { ObjectDirective } from 'vue-demi'
import { onClickOutside } from '.'
import type { OnClickOutsideHandler, OnClickOutsideOptions } from '.'
export const vOnClickOutside: ObjectDirective<
HTMLElement,
OnClickOutsideHandler | [(evt: any) => void, OnClickOutsideOptions]
> = {
[directiveHooks.mounted](el, binding) {
const capture = !binding.modifiers.bubble
if (typeof binding.value === 'function') {
(el as any).__onClickOutside_stop = onClickOutside(el, binding.value, { capture })
}
else {
const [handler, options] = binding.value
;(el as any).__onClickOutside_stop = onClickOutside(el, handler, Object.assign({ capture }, options))
}
},
[directiveHooks.unmounted](el) {
(el as any).__onClickOutside_stop()
},
}
// alias
export { vOnClickOutside as VOnClickOutside }Note that the Svelte version is completely isolated, in that it does not depend on any additional imported code as seen in the Vue and React versions. In terms of syntax, I will leave it up to you to decide which one suits your style better. But I hope we can agree on the following observation:
clickoutsidewritten in Svelte is vanilla Javascript, it does not depend on any Svelte-specific API. Instead, React and Vue require an abstraction layer to work in the context of the framework.
Why does this matter? Svelte takes away abstraction and allows us to get closer to vanilla technologies, specifically HTML, CSS, Javascript, and standard web APIs. Any developer having fundamental knowledge of the web can easily pick up Svelte and start making things. And when Svelte inevitably fades away one day as a technology of the past, this knowledge will still be valuable, because it is knowledge about the web, not specific to Svelte.
In other words, in this example, Svelte does not do much, it builds upon the web. The web is the true framework we should care about.
Compiler is the Framework
The most significant difference of Svelte, at least when it first came out, compared to other frameworks is the fact that it uses a compiler to analyze source code at compile time to minimize code required at runtime. Svelte does not use a virtual DOM like React or Vue does, but brings the reactivity model into its compiler. If what I just said makes little sense to you, think of it as follows:
Svelte helps us optimize source code before it is even run on end users’ machines. The result is often a lighter and faster web page!
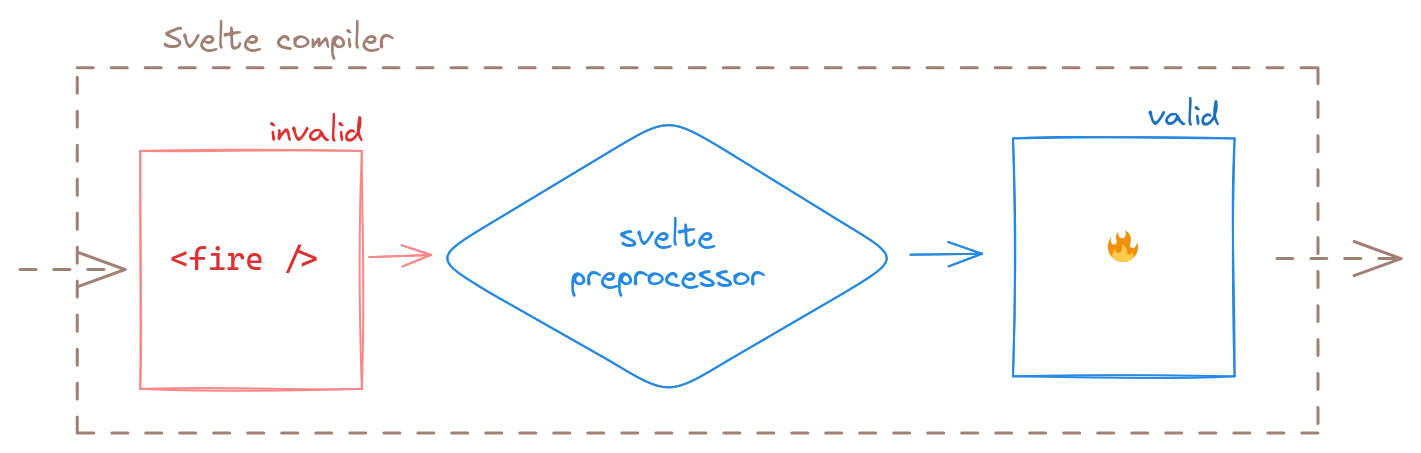
However, in this post, we will not talk about this optimization aspect, but rather how Svelte allows us to extend the compiler to create custom features, through an API called Svelte Preprocessor. In short, a Svelte preprocessor is a function that takes in Svelte source code and returns new Svelte source code with any changes we want as long as at the end of the compilation process, the source code still follows valid Svelte syntax.
This time, our task is: implement a static blog using markdown, similar to the sveltevietnam.dev page you are reading. Specifically, transform the following markdown code:
```javascript
/// title=example.js
function hello() {
  console.log('hello world');
}
```
into this interface:
function hello() {
  console.log('hello world');
}
To achieve this, we need to go through quite a few steps
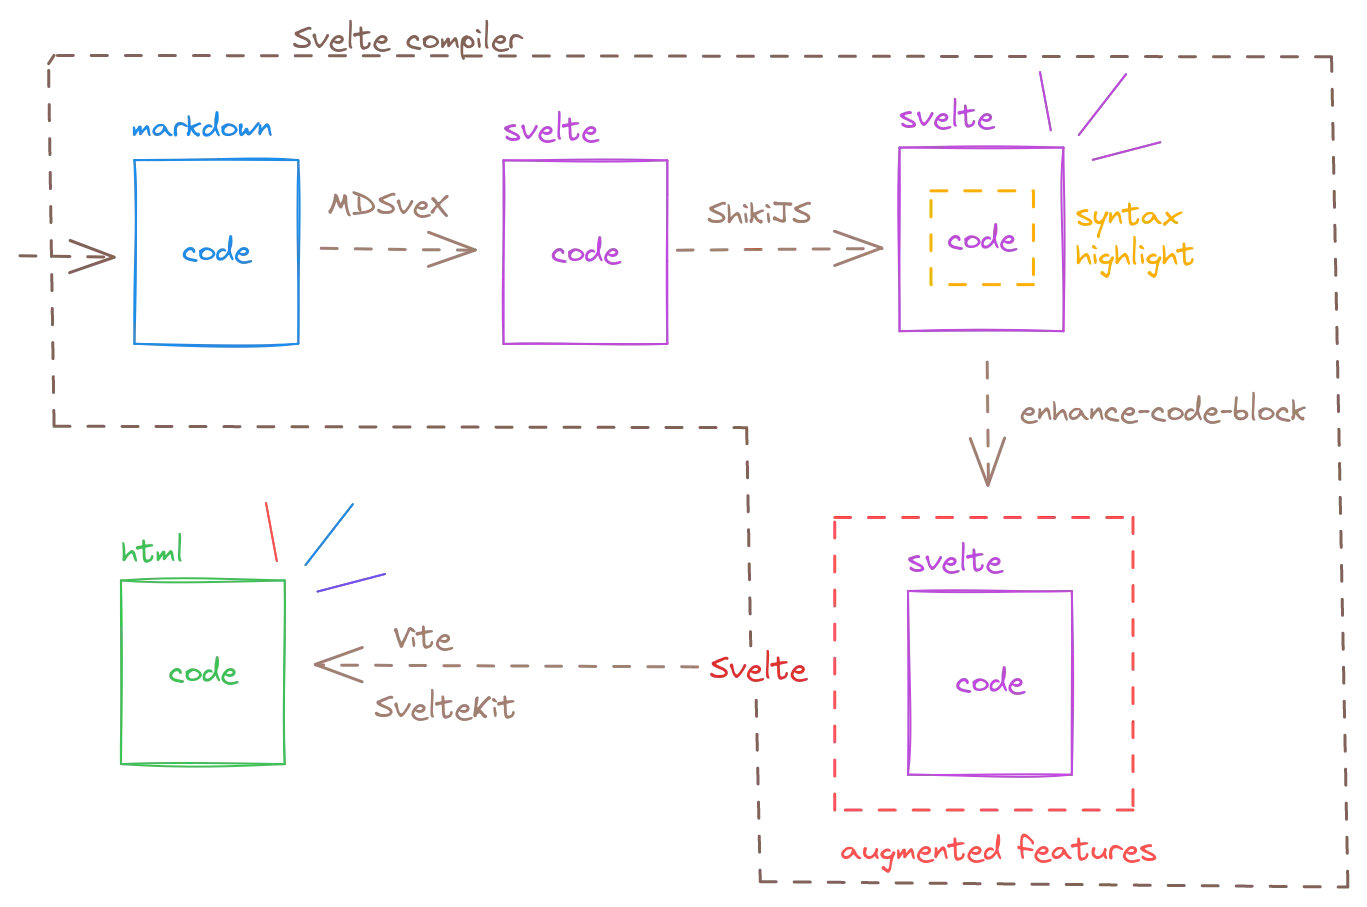
- Use the Svelte preprocessor MDSvex to transform markdown into corresponding Svelte components.
- Use Shiki to provide syntax highlighting for code snippets.
- Use a Svelte preprocessor called
enhanced-code-block(a custom preprocessor I wrote) to provide additional features such as line numbers, title, copy button, and accordion. - Use Vite as the build tool to render the final HTML page, similar to the one you are reading.
Let’s not get into the implementation details of these Svelte preprocessors. If you are interested, refer to svelte.config.js, which sets up all necessary preprocessors to build the Svelte Vietnam Blog.
Thanks to the Svelte preprocessor API, the above task becomes not only feasible but also relatively easy, even for an mediocre developer like me. If the same task were to be done with another framework, I am not sure if I could confidently take on the assignment, or if it would even be possible.
No one cares
The fact is, nobody really cares about frameworks and their features. What we all ultimately want is to be able to develop efficient and maintainable softwares while creating the best possible experience for users. Fortunately, the creators of Svelte understand this well. In a discussion named ”Tenets”, opened by Rich Harris himeself, he explains that Svelte does not aim to be the fastest, lightest, most adopted framework, or to achieve the highest scores in benchmarks or Lighthouse audits. Instead, Svelte aims to be one with “best vibes”.
Following the two examples, we see that: if you understand HTML, CSS, and Javascript, you will have a great time with Svelte. Similarly, if you have knowledge about computer science, you can extend Svelte to server your exact needs, those that even Svelte creators do not even know are needed. Everything comes back to the fundamentals. Svelte is exceptional at staying out of your way, allowing you to focus on building a better web.
So, if this post tingles your curiosity about Svelte, remember this:
Don’t come for the hype or stay for the drama.
Instead, come for the ideas, stay for the fundamentals.
Come for Svelte, and stay for the web.
Found a typo or need correction? Edit this page on Github