This post is part of the “Behind the Screen” series, where I share my experience and lessons learned while building sveltevietnam.dev. You can find the previous post at ”A Few Secrets of sveltevietnam.dev“.
In the previous post, I mentioned briefly about the splash screen of sveltevietnam.dev. This is the first UI that users see when they visit the site; it plays a short introductory animation series to capture users’ attention and welcome them in. You can reload the page (ctrl/cmd + R) at any point to trigger said splash screen. If you don’t use Javascript, close the browser tab and open a new one.
In this post, we will dive deeper into the practical values that splash screen brings to the table, as well as how sveltevietnam.dev sets it up to serve as many users as possible, including those who don’t use Javascript.
Not Just for Show
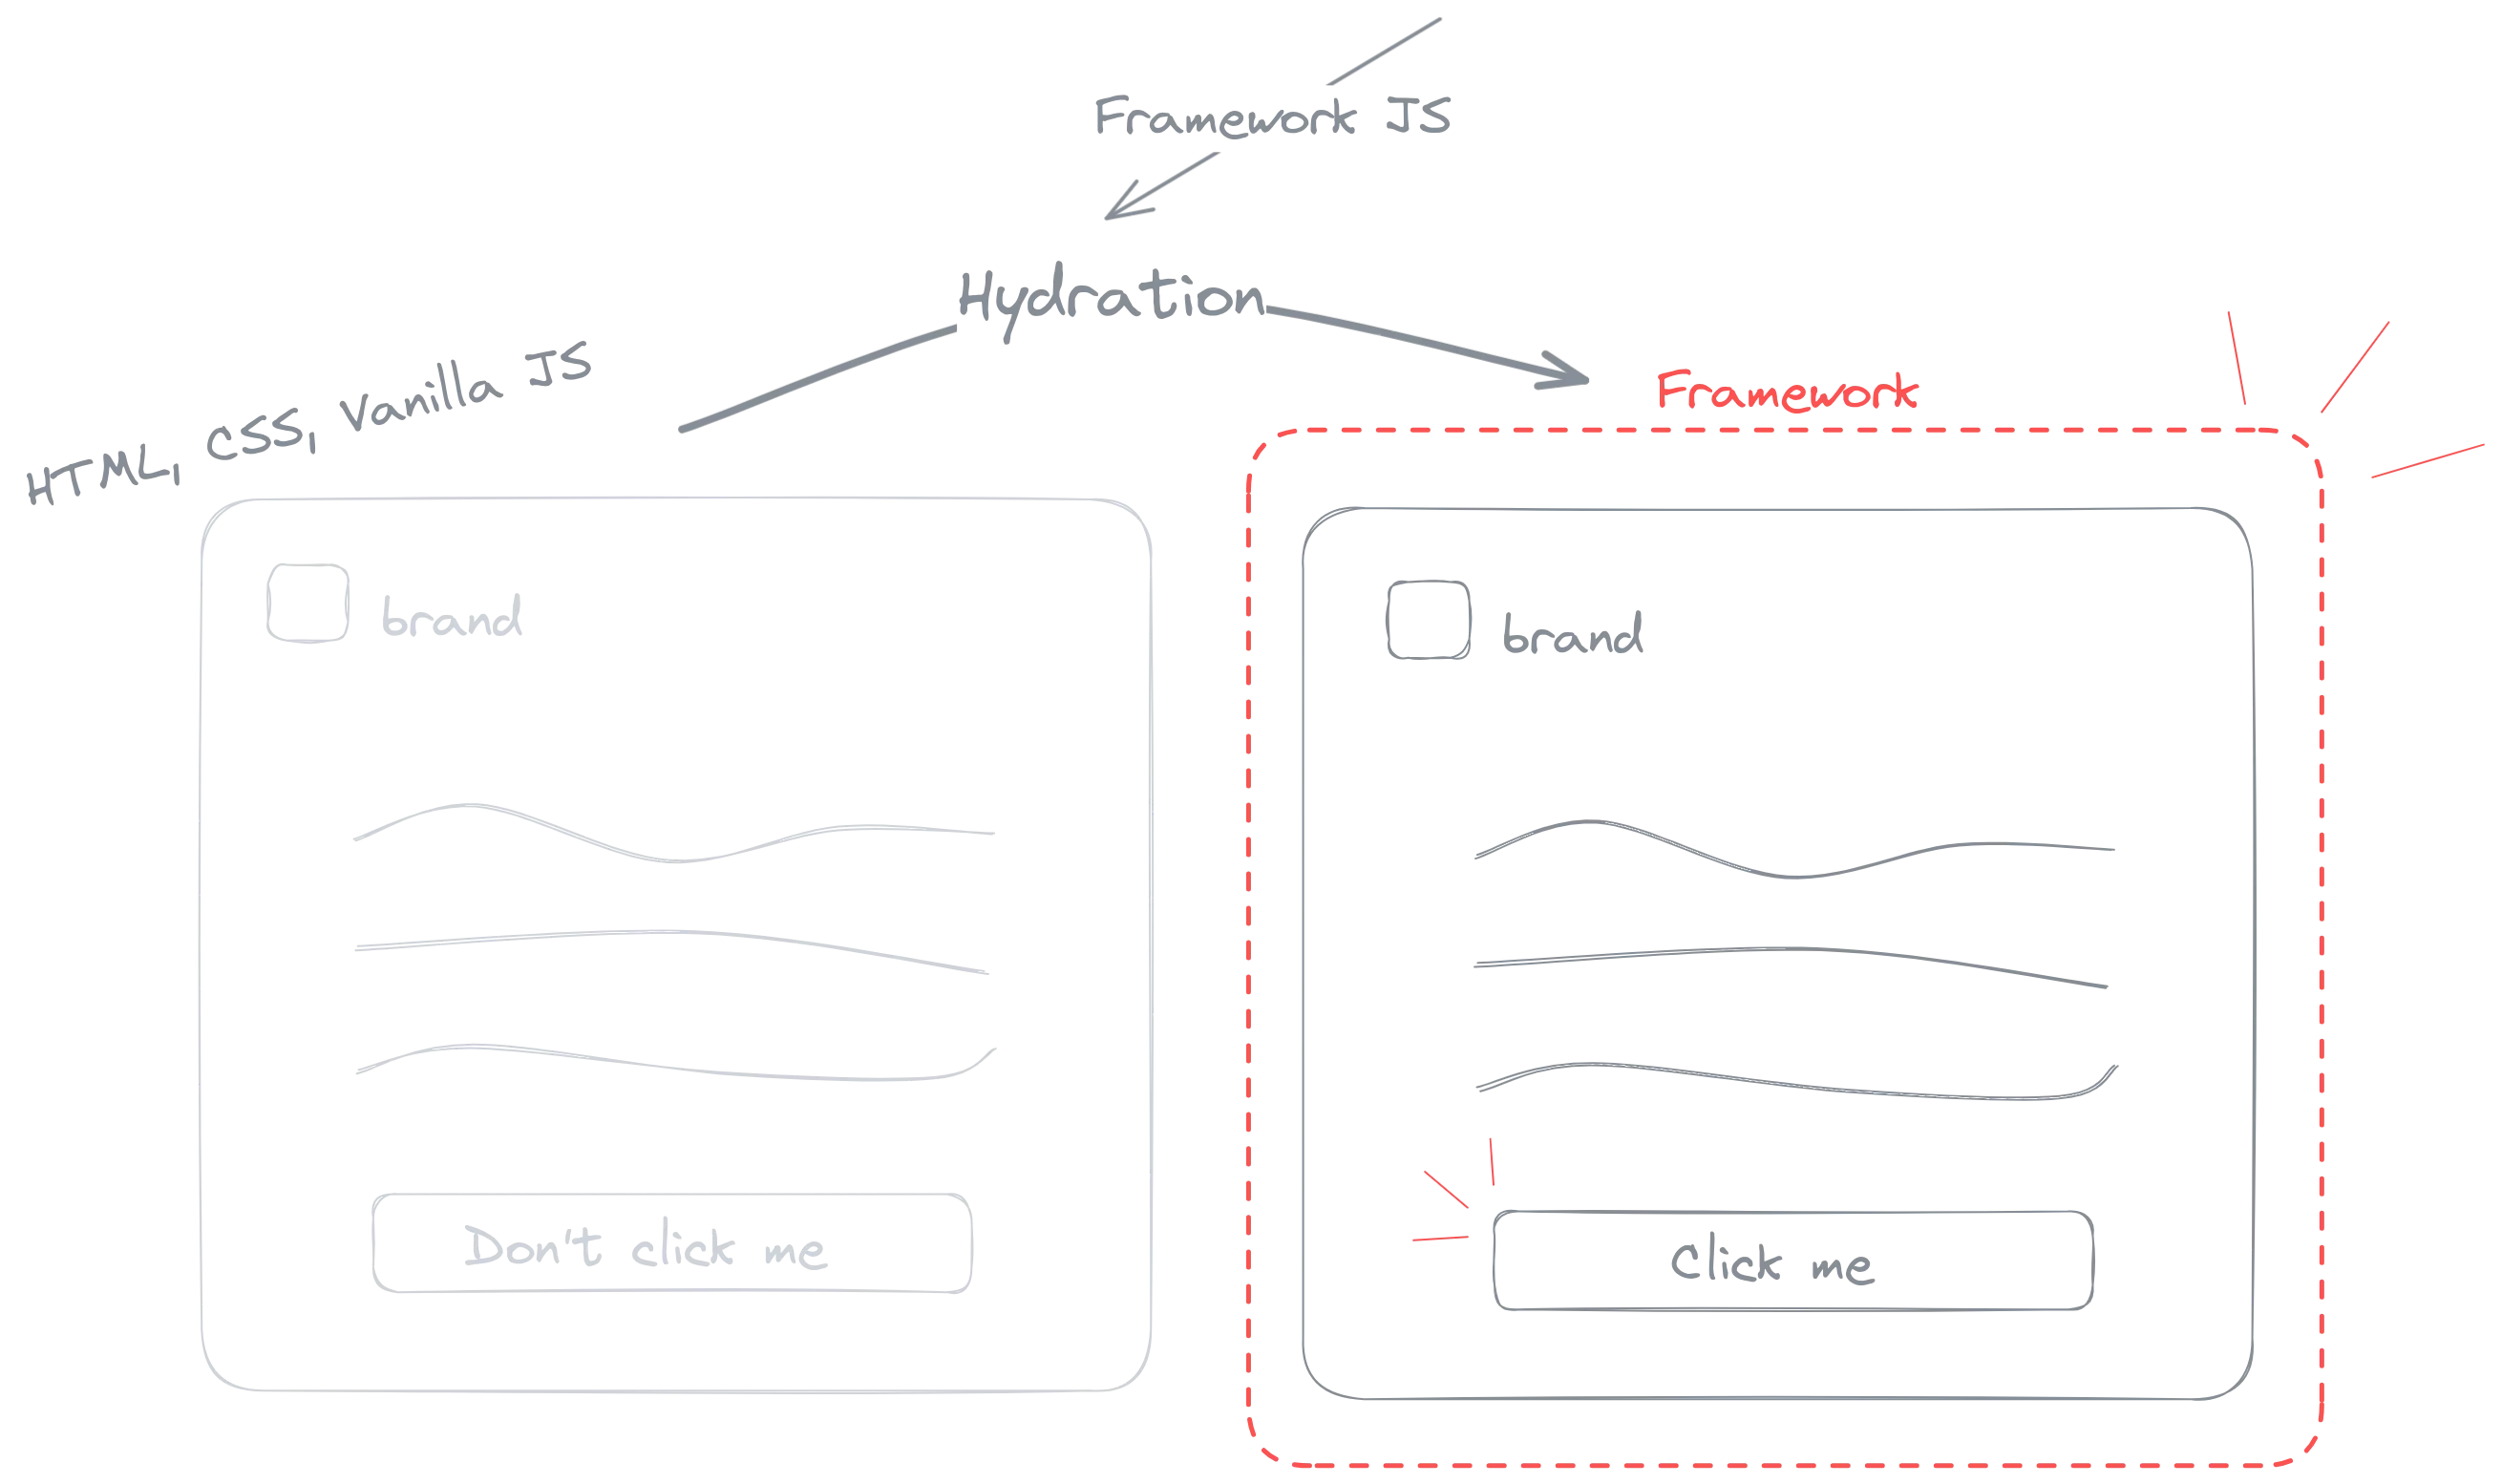
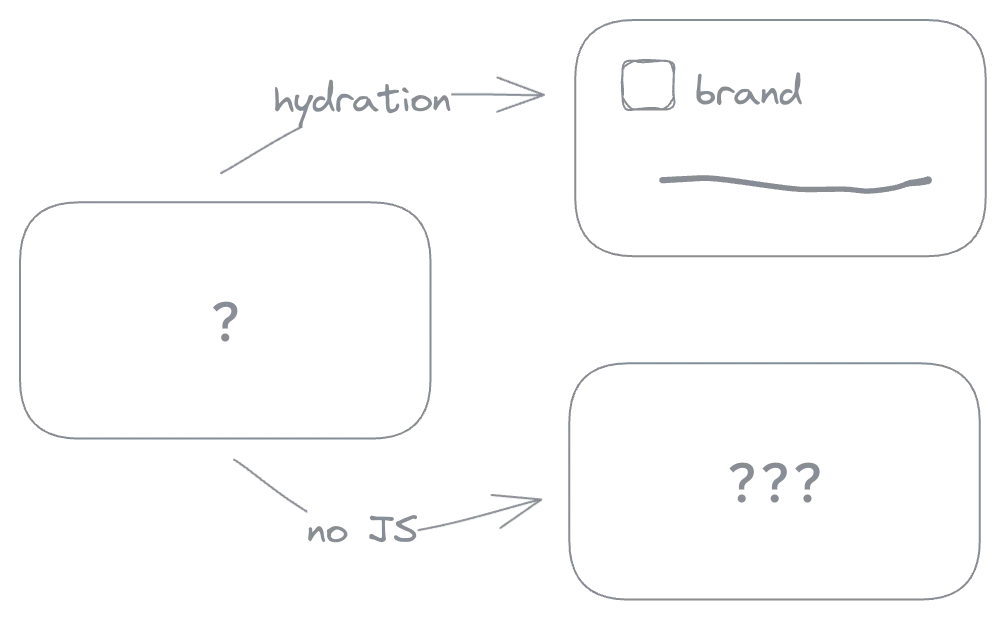
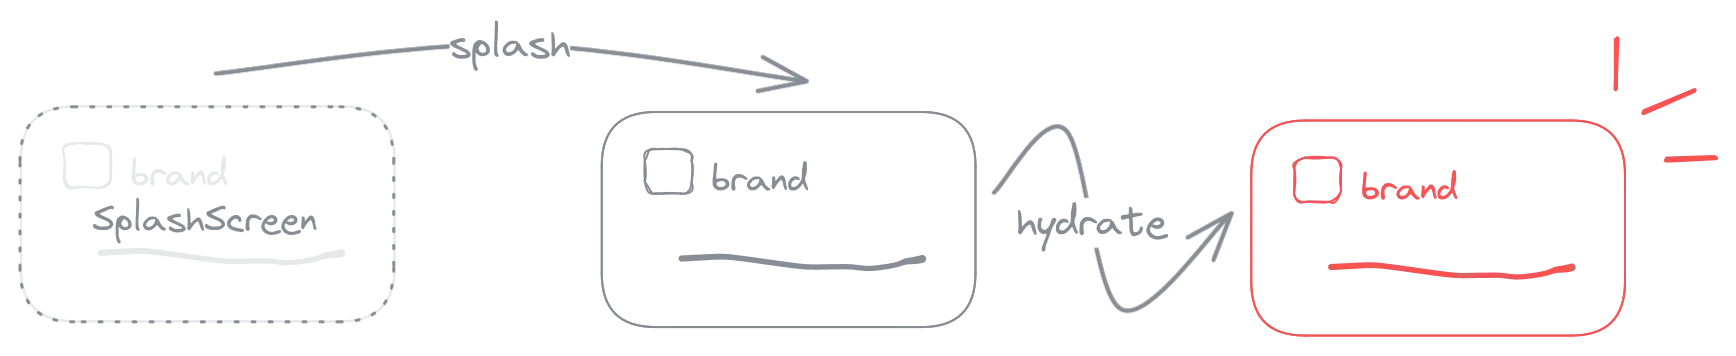
At first glance, splash screen seems to only serve branding and entertainment purposes. For users, such perception is well intended. From a technical perspective, however, splash screen also helps buy time while the site is fetching resources and preping for later stages. This process is called ”hydration” and is common in most popular frontend frameworks nowadays. In a few words, hydration is the procedure that transforms a static web page into a dynamic one by setting up an environment necessary for the framework to perform DOM updates in response to user interactions and system changes. In other words, if you write Javascript in the context of a framework (React, Vue, Svelte, …), those pieces of code only take effect after hydration has finished it job.
For pages with many transitions and animations, especially those that require Javascript such as GSAP or IntersectionObserver, one common problem is a flash or glitch right after hydration has completed. Many websites, especially single-page applications, get around this by blocking the content from being displayed until Javascript has been loaded (hydration has completed). It’s easy to see that this approach has two consequences:
- The site is unusable until hydration has completed. When the network is unstable, resource fetching is delayed and users may have to wait for a long time before they can see any content.
- For users who don’t use Javascript, the site becomes completely useless because no content is displayed, and hydration never takes place.
For (2), you might find it strange that there are users who don’t use Javascript. I mentioned this in the previous post. It happens more often than we think, and any user can fall into that situation. You can check this diagram for more details.
As such, although simple, this display-blocking solution does not provide the best user experience. To overcome both of the consequences above, we need to server-side-render the web page, then send HTML and CSS directly to the browser for an initial render, and let hydration take place naturally afterwards. But then we are back to square one: how to hide the glitch right after hydration has completed? The second solution is to display a splash screen.
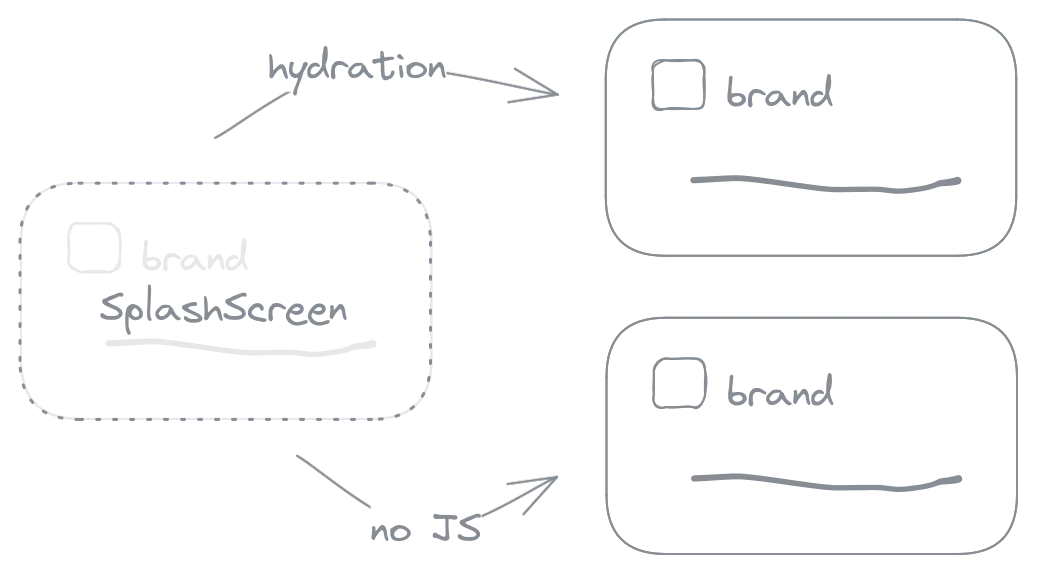
Of course, this solution does not come without its own problems, which we will discuss in the following sections.
To Splash or Not to Splash
Since the publication of this post, I have received several comments about the fact that a splash screen or loading indicator might actually hurt user experience by making things “appear” to be slower than they actually are. Generally, I agree with this point of view, and also want to expand further that you should always spend efforts to make your site actually faster, especially if it is time-critical and its content should be shown as soon as possible to users.
In any case, you should discuss with your team and consider carefully if your application and audience will benefit from a splash screen. Worry not as the techniques introduced in this blog post is applicable to other use cases as well, not just splash screen!
Vanilla
From what we have discussed, a splash screen needs to satisfy the following basic conditions:
- should be the first thing that users see when they visit the site, and it should be on top of the content of the page,
- should work even when users don’t use Javascript,
- should be independent and not affected by the hydration process.
In other words, splash screen needs to be in HTML and CSS without any JS dependency. More importantly, it must live outside the framework context, otherwise splash screen animations will be janky and repeat upon hydration.
During hydration, DOM elements might be rerendered or remounted, causing CSS animation to restart. There have been discussions about this (issue #4308, #8194, #8209, #7775), but currently there is no definitive solution from the framework. Nevetherless, no matter which framework we use, it is a good idea to keep splash screen independent from the hydration process to ensure its stability.
Using vanilla? Doesn’t it sound bizarre in today’s world that is flooded with frontend frameworks? Perhaps you have been discouraged from using vanilla and told to use only what the framework provides. I assure you that using vanilla is perfectly normal, even necessary in typical situations like one presented here. Remember that frameworks come and go, but vanilla (HTML, CSS, JS) will always be there.
In the context of Svelte and SvelteKit, there are many ways to apply HTML outside the “hydration zone”. The simplest way is to add code directly to app.html:
<!doctype html>
<html>
  <head>...</head>
  <body>
    <div id="splash">
      <!-- "vanilla", independent from framework and its hydration -->
    </div>

    <div class="contents">
      <!-- hydration zone -->
      %sveltekit.body%
    </div>
  </body>
</html>
If you don’t already know, app.html is the starting template that SvelteKit uses to render page content into before sending off to clients. Hydration takes place at %sveltekit.body%. See the “Project files” section in SvelteKit docs for more details. Our div#splash is outside of %sveltekit.body% so it is not affected by hydration. Next, for CSS, we declare a separate file…
#splash {
  /* applicable styles for animation and such */
}
…and import this directly in an appropriate +layout or +page. For example, to apply to all pages, import in the root +layout:
<script>
  import 'path/to/splash.css';
</script>
It is possible to declare splash.css directly in app.html. However, by doing so, we treat splash.css as a static asset and cannot use CSS preprocessors like Sass or PostCSS. Hydration is not relevant when it comes to CSS, so we can still import from *.svelte files in Svelte and SvelteKit context, which is quite convenient!
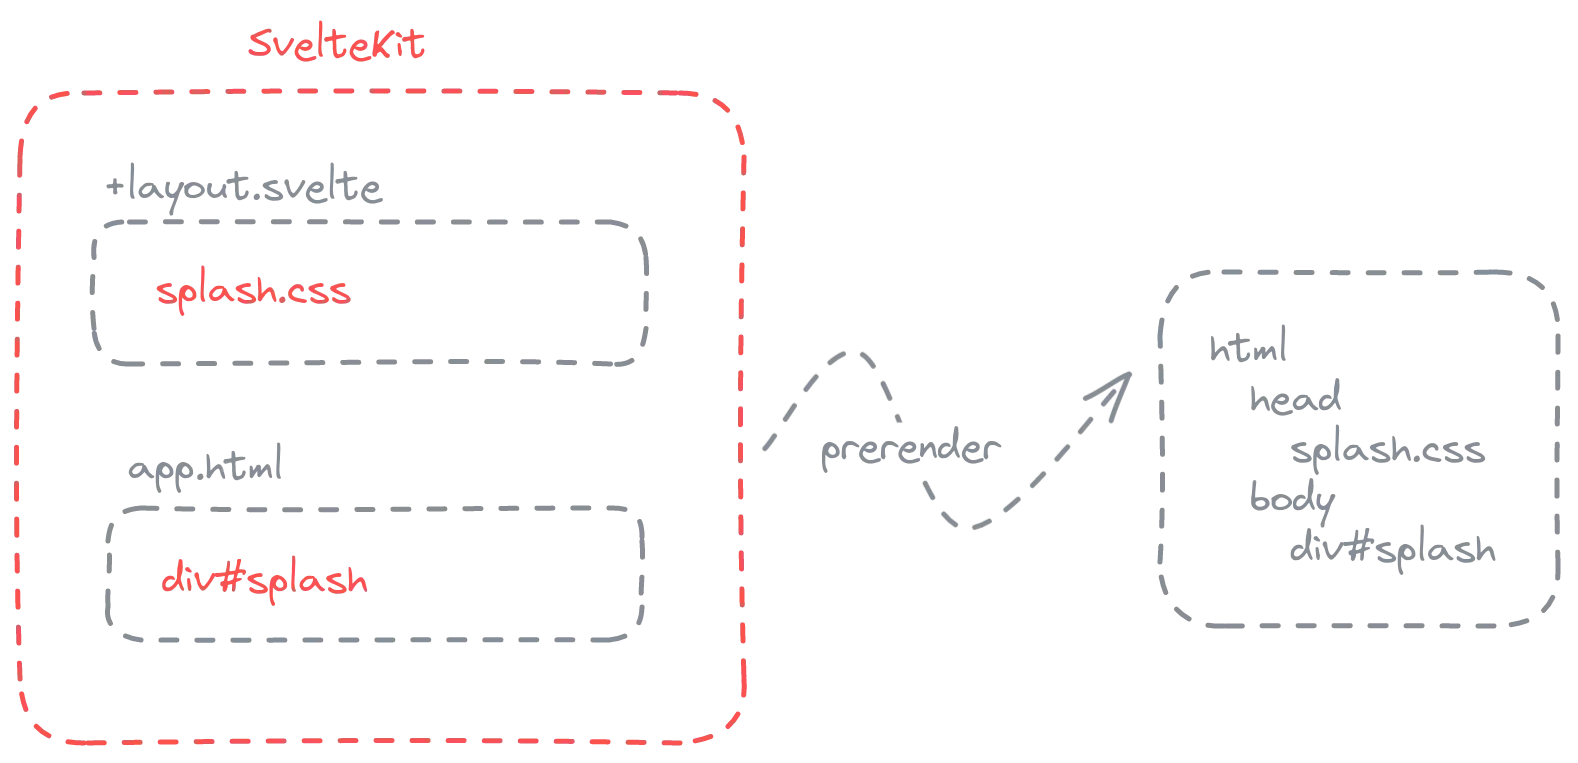
Implementation details for a splash screen depend on the design of each application. You can refer to the splash screen implementation of sveltevietnam.dev at app.html and splash.css. In general, a splash screen often has the following characteristics:
- has
positionoffixedorabsolute, with a properz-indexto cover the content of the page underneath, - has relatively simple animations, lasting from 1-3 seconds in total, and the last animation should move the entire splash screen out of the viewport so that users can interact with the site.
The core is now done. In the following sections, we will focus on further improvements to provide the best experience for users.
Avoid repetition during navigation
Splash screen should only run once when users first visit the site and not repeat when they navigate between pages. Fortunately, if you use SvelteKit and client-side-rendering (CSR) is enabled, the site will use a client-side router for smart navigation without reloading the page: meaning that splash screen will not repeat. In such case, because hydration has completed, essential Javascript resources have been loaded, and the site lives in the framework environment, we will not encounter the aforementioned glitch problem during navigation.
However, in case when CSR is turned off or Javascript is not available, each navigation is considered a new page, the entire HTML of the page is reinitialized, and splash screen will run again. To work around, we need to add server-side processing with the following strategy:
- When users first visit the site, display the splash screen.
- When users navigate internally (e.g. from
/ato/b), do not display the splash screen again.

First of all, we add an attribute to the div#splash element:
<!doctype html>
<html>
  <head>...</head>
  <body>
    <div id="splash">
    <div id="splash" data-splash-skip="%splash-skip%">
      ...
    </div>
    ...
  </body>
</html>
%splash-skip% will be replaced with true or false, depending on whether (1) or (2) applies, by hooks.server:
/** @type {import('sveltejs/kit').Handle} */
export const handle = async ({ event, resolve }) => {
  const { url, request, locals } = event;

  // check for Referer header to know where the user is navigating from
  const referer = request.headers.get('Referer');
  if (referer) {
    const urlReferer = new URL(referer);
    if (urlReferer.origin === url.origin) {
      locals.internalReferer = urlReferer;
    }
  }

  await resolve(event, {
    transformPageChunk: ({ html }) => html.replace('%splash-skip%', String(!!locals.internalReferer)),
  });
};
You can inspect to see if the code works by disabling Javascript on the page. If you use Chromium-based browsers, follow the steps below:
- open devtool,
- press Ctrl/Cmd + Shift + P to open command palette,
- type “Disable Javascript” and press enter or select the appropriate option from the result list.
To turn on Javascript again, follow the same steps but replace the command with “Enable Javascript”. Now, the rest is to edit splash.css accordingly to hide the splash screen if data-splash-skip is true:
#splash {
  &[data-splash-skip="true"] {
    display: none;
  }
}Slow Network
In happy cases, hydration completes while the splash screen is still running, and the system is ready to welcome users. After hydration finishes, users can immediately start interacting with the site.
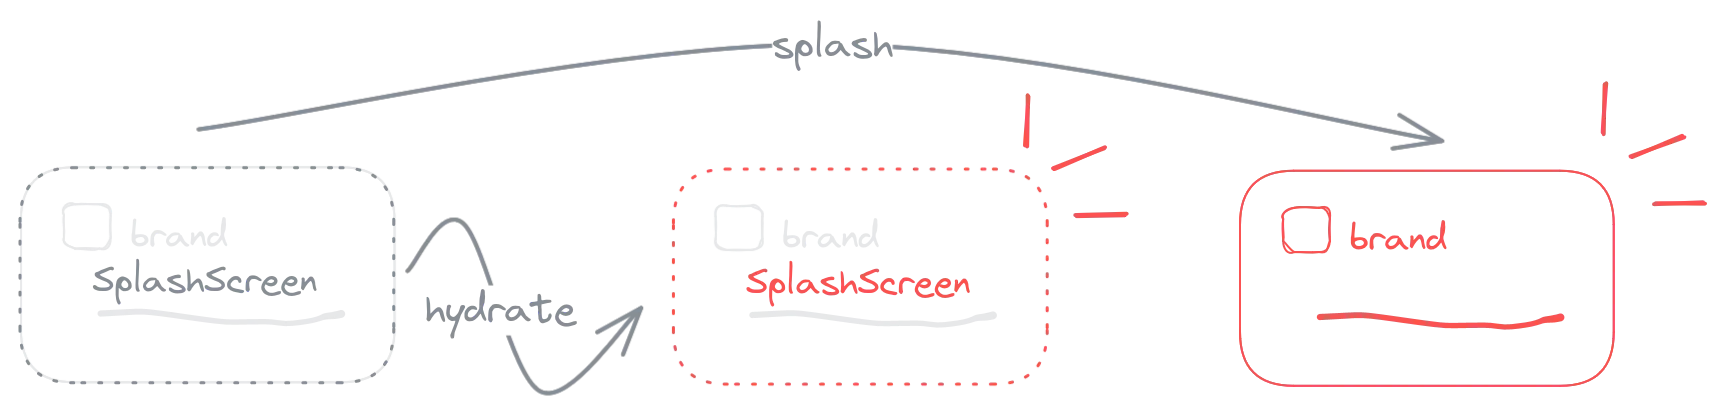
But, on slow network, hydration is delayed and takes place after the splash screen has ended. At this point, because the page has been rendered from the server, users can still read the content of the page, but features that require Javascript will not work until hydration has completed.
Unfortunately, in situation such as this, we cannot avoid the glitch problem, as discussed in previous sections. However, we can notify users so that they understand why it happens. This approach is based on a basic principle of user experience design: always communicate and provide information about visible system changes. This is the notification used by sveltevietnam.dev:
Interrupt has been detected due to unstable network. We are sorry for this inconvenience!
To achieve this, we need to detect whether hydration completes after splash screen has ended. First, we save the timestamp when the splash screen ends:
<html>
  <body>
    <div id="splash">...</splash>

    <script>
      function stamp() {
        document.documentElement.setAttribute('data-splashed-at', new Date().toISOString());
      }

      const splashEl = document.getElementById('splash');
      if (!splashEl || splashEl.getAttribute('data-splash-skip')) {
        stamp();
      } else {
        splashEl.addEventListener('animationend', (e) => {
          if (!splashEl.isSameNode(e.target)) return;
          stamp();
        });
      }
    </script>
  </body>
</html>
Be aware: you need to listen to the correct animationend event because splash screen may include multiple animations on different HTML elements. When an animation ends, its element will emit an animationend event and bubble it up. In the example above, the last animation is on the div#splash element itself.
Here, you see that we are, again, using vanilla JS. Let me re-emphasize: this is perfectly normal. We need to use vanilla because if the code above lives in a framework component, it will not take effect until hydration has completed - meaning that our code would become useless. We also don’t set defer, async, or turn the script into a module because we want it to run as soon as possible to not miss the animationend event. Next, we get the timestamp when hydration has completed and compare it with the splash screen timestamp:
<script>
  import { browser } from '$app/environment';

  if (browser) {
    const hydratedAt = new Date();
    const intervalId = setInterval(() => {
      splashedAt = document.documentElement.getAttribute('data-splashed-at');
      if (splashedAt) {
        clearInterval(intervalId);
        if (hydrated > new Date(splashedAt)) {
          // hydration completes after splash screen
          // indicating that the network is slow:
          // display appropriate notification
        }
      }
    }, 250);
  }
</script>
The above code can be placed almost anywhere: as long as it lives within the hydration zone, it will only run after hydration has completed. Also, we can use MutationObserver to track changes from the data-splashed-at attribute instead of setInterval, but I think that is unnecessarily complicated and overkilled.
Note that depending on how much resource your site needs to fetch and how long your splash screen animation is, you might need to adjust the timestamp comparison condition. At sveltevietnam.dev, for example, we only trigger notification if hydration completes 2 seconds after splash screen has ended. It is a good idea to play around, add or remove some seconds to see what works best for your site.
To simulate slow network, you can select “slow 3G” from the network settings within the browser devtool.
Bonus: Keeping it Fun and Fresh
There is rarely an opportunity such as with splash screen to express your creativity. It is a fantastic chance for a fruitful collaboration between designers and developers to create together something unique, fun for both users and the team. If you have visited sveltevietnam.dev (or reload the page) enough times, you might have noticed that we actually have two variants for the splash screen animation sequence. One is short and more frequent version (3/4 chance), while the other is longer and only shows up from time to time (1/4 chance). You can experiment with both in the playground below (Javascript required). Select the desired variant and press “play”.
Choose variant:
Closing
Looking back, we have implemented a splash screen that:
- has its core built on “vanilla” HTML and CSS,
- only displays once and does not repeat during navigation,
- works even when users don’t use Javascript,
- can help detect slow network when Javascript is available.
It is fair to say that this splash screen implementation meets the necessary requirements for ”progressive enhancement” - an important concept in user experience design that I encourage you read more about if haven’t already. The process of setting up splash screen has reminded me that using vanilla HTML, CSS, and Javascript is perfectly normal, no matter which framework is in use. Fortunately, Svelte is designed to stay close to standard web APIs; I find that most documentation and articles in the Svelte ecosystem do not discourage us from using vanilla technologies. That is one of the reasons why, for me, working with Svelte is so natural and ergonomic.
You can join the Svelte Vietnam Discord for further discussion on this topic. Thank you very much for reading!
Found a typo or need correction? Edit this page on Github